

Introduction: Fix It: Attic Rafter Scab


Overview
From time to time, an attic rafter will split along a knot - typically after having a new roof installed because of the workers walking around on it. Obviously, this is not a good situation as it can cause the entire roof to fail if not addressed. Repairing this is called scabbing.
The important aspects of this repair is the length of the split as you will need to adequately cover it and provide enough length to your scab to get into good wood beyond the affected area.
The following steps ensure that the rafter won't fail and if this repair is part of a list from an inspection report, it will pass inspection.
Step 1: Measure the affected area
Step 2: Prepare the scab boards
Step 3: Compress the rafter to original state (as much as possible)
Step 4: Clamp the scab boards to the rafters
Step 5: Drill lag bolt holes through all three boards
Step 6: Install lag bolts with washers and tighten
Step 7: Remove support and clean up
Materials needed
(2) scab boards cut to length (step 1)
(6) 3/8-inch hex head bolts - 5.5 - 6 inches long
(6) matching hex head bolt nuts
(12) matching bolt washers
(1) 4x4 post
(2) wood clamps
(1) sheetrock screw
1/2 inch wood bit (paddle or spiral)
(2) box-end wrenches or sockets that match bolt/nut
hammer
battery-powered drill
drill-press (optional)
NOTE: It is useful to read this entire tutorial before attempting any of the steps as there are several pieces of information that are needed and going up and down into the attic is tiresome.
Step 1: Measure the Affected Area

For the fix in this picture, the affected area was about 24 inches. It's a good idea to offer at least a foot on either side of the affected area to get a good, long lasting scab. At most home centers, 2x6s are sold in 8 foot lengths, which means I can get two 4 foot sections from one board - just right for the repair.
A note about board selection
To ensure the scab didn't fail in the same way the original rafter did, you should select your 2x6 with as little knots as possible and look for nice straight, horizontal grain. Since the board will not be outdoors, it's not necessary to get pressure treated wood.
There are two other measurements you'll need for the 4x4 compressions support post:
- the distance from the underside of the rafter to the joist beneath it - use the central part of the split as this is where the support will be most useful.
- The angle of the rafter in comparison to the floor joists. This will be different for every roof and will match the pitch of the roof. I used a piece of wood that was longer than the distance between the floor joist and the rafter and then just traced the angle on the side of that piece of wood.
The first measurement gets you the length of the support and the second one gets you the angle needed to make the support match the rafter as you force it into place. The reason we're using a 4x4 post is so that after it's in place, you can rest your scab boards on top of it while you clamp them in place. This was a critical piece of the equation as the scab boards are heavy and if you're doing this by yourself, it's like having a third hand.
Step 2: Preparation
To make things easier in the attic (cramped, hot space), there are a few things that can be done down where's it's cool(er).
Scab boards
After you have cut the scab boards to length, drill a set of holes in one of the scab boards where you want the lag bolts to go. I used 3/8 inch bolts, so I drilled 1/2 inch holes to ease in the installation - 3 on each end in that last foot. Don't get too close to the end (3 inches recommended) as you don't want it to split - we're trying to prevent that...right? It's also a good idea to mark the center lengthwise - this will help line things up in the attic.
Compression post
The role of the 4x4 compression post is to get the rafter back into its original position as much as possible as well as have a temporary resting place for the scab boards.
Using the angle you recorded in the attic, set your miter saw blade angle to match. Then mark your post with the desired length in the middle of one side and run the blade of your saw through that mark. This ensures that the post will be centered on the spot where you measured when you install it.
Assemble your tools
I used a plastic box with a lid and put the bolts, nuts, washers, clamps, hammer and drill bit (don't put it in your drill just yet) in it. This helped keep everything handy. A magnetic dish might also be helpful to keep the hardware from rolling around in the bottom of the box. Also, put a phillips bit in your drill before you carry it up.
Now you're ready to haul it all up into the attic and setup your work site.
Step 3: Install Compression Post
First thing is to get the rafter back into its original position as much as possible. That's the role of the compression post. The idea is to set it on the floor joist (you can use a 2x4 to span joists if needed - just be sure to account for this when measuring the length of the post) and use your hammer to force it under the rafter.
So, set the base of the post a little forward (down slope) of the top and hit the top of the post with the hammer until the rafter is either fully compresses or it won't go any further. Try to center the post on the rafter side-to-side as you want it to stick out on each side to support the scab boards (see why I chose a 4x4). Then grab that sheetrock screw and secure the top of the post to the rafter to keep it from kicking out.
SAFETY NOTE: The rafter and post are now under a lot of tension, so be careful not to bump the post or it could shoot down through the ceiling or hit you (ouch).
Step 4: Set and Secure the Scab Boards
Now that the post is set, it's time to get the scab boards into place. Carefully set each one on top of the post in line with the rafter making sure the ends of the two scab boards are lined up. Put the pre-drilled board to the side that you feel most comfortable working from.
Secure the up-slope end with your clamps being sure not to cover your bolt holes. It's important to get the underside of the scab boards to line up with the underside of your rafter. Clamp them and then use your hammer to get them into position. Do the same for the down-slope end.
Drill bolt holes
The pre-drilled bolt holes are now a template for drilling through the rafter and the other scab board. Put the 1/2 inch bit into the drill and drill through the other boards in each of the 6 positions.
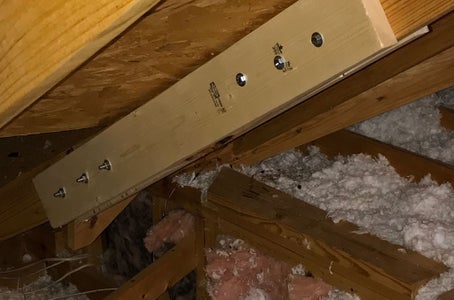
Install bolts
Now it's a matter of adding a washer and pushing the bolt through the hole and adding the other washer and then the nut. Hand-tighten and then use the wrenches/sockets to tighten down. I didn't go crazy on how tight I went as I didn't want to compromise the scab board integrity, but I also didn't want it coming loose.
Remember the scab boards and bolts are what work together to return structural integrity to the rafter and roof system. Take your time and do the planning needed to optimize your time in the attic.
SAFETY NOTE: If you are performing this repair in summer like I did, monitor your body heat carefully. It's best to have a buddy as you can help set things up and monitor each other for heat-related physical problems. Take breaks and drink plenty of fluids and allow yourself time to recover before moving on to the next project.

Participated in the
Home Improvement Contest 2017

Participated in the
Fix It Contest


